Microgreen-Sorte
Radish Microgreens
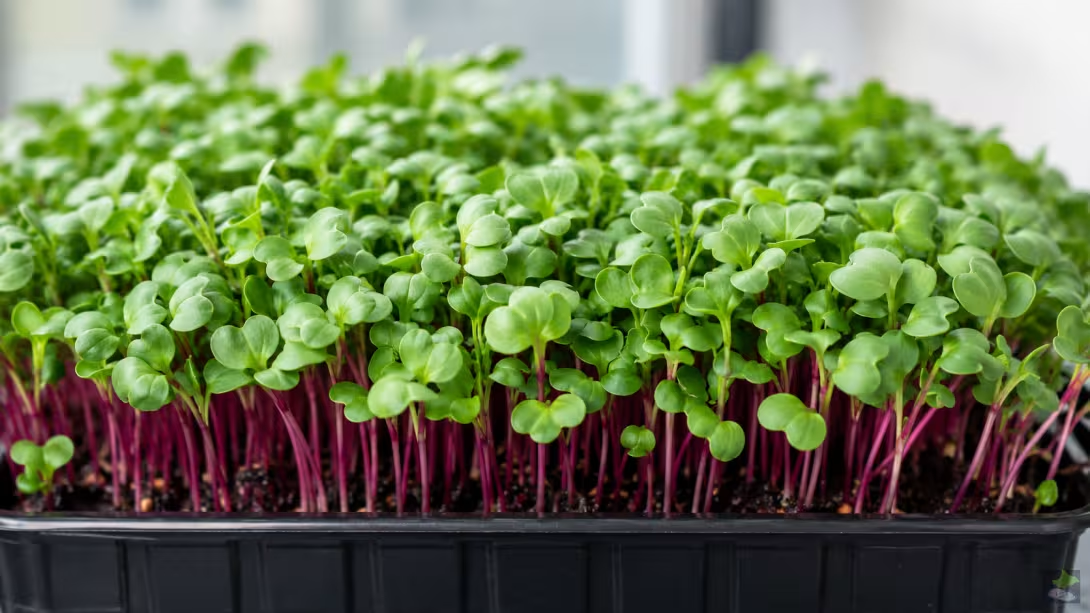
Radish microgreens are fast-growing crops and are therefore well suited to initial standardised growing trials. They produce sturdy hypocotyls, green cotyledons and—depending on cultivar and light—sometimes reddish to purple stems. Their flavour is generally much spicier and more pungent than that of many mild leafy microgreens.
In brief:Radish microgreens are fast, robust and aromatic. Suitable seed, uniform sowing, controlled moisture, adequate light and rigorous hygiene remain essential.
Profile
- Botanical species: Raphanus sativus
- Plant family:Brassicas (Brassicaceae)
- Flavour:spicy to distinctly pungent, depending on cultivar
- Growth:rapid, generally uniform and comparatively vigorous
- Harvested part:hypocotyl and above-ground leaves
- Typical harvest stage:from fully opened cotyledons to emergence of the first true leaf
- Suitability:a good beginner crop for documented trials
What distinguishes radish microgreens
Radish microgreens are grown from seed of the same species that later forms the familiar storage root. In microgreen production, however, the crop is not left to develop a radish bulb. The young above-ground growth, comprising stems and leaves, is harvested.
“Microgreen” describes a developmental stage, not a specific cultivar. Green, red and purple-stemmed radish cultivars can differ in colour, pungency, height, germination speed and yield. Information supplied by a seed vendor should therefore always be verified through your own germination and cultivation trials.
Selecting suitable seed
Use viable, true-to-type seed expressly intended for food or microgreen production. Chemically treated, pelleted or otherwise unsuitable seed must not be used for edible microgreens.
Record at least the supplier, cultivar name, batch number, purchase date and germination-test result. This makes it possible to distinguish poor emergence caused by seed from problems caused by growing conditions.
Testing germination before sowing
For a simple germination test, place a known number of seeds on clean, moist paper and keep them under suitable conditions. The proportion of normally developed seedlings gives the germination rate. Weak or substantially delayed germination should not simply be offset by increasing the sowing rate.
Preparing trays and substrate
Shallow, food-safe trays with drainage holes facilitate controlled watering. A solid bottom tray later allows water uptake from below. Containers must be stable, undamaged and easy to clean.
Suitable propagation media or purpose-made fibre mats can be used as the growing support. The material should retain moisture evenly while allowing air to reach the roots. Persistent waterlogging increases the risk of oxygen deficiency, weak growth and microbiological problems.
Determining sowing density through trials
Dense sowing is typical for microgreens, but more seed does not automatically produce a better result. Excessive spacing wastes area; an overcrowded stand dries poorly, competes more strongly for light and can develop damp zones.
Penn State Extension gives a broad general range for microgreens of about two larger to twelve smaller seeds per square inch. This guidance does not replace species-specific testing. For radish, the sowing quantity should therefore be documented and gradually optimised for every cultivar, batch, tray size and growing method.
Sowing reproducibly
- Record the internal tray dimensions and the area actually sown.
- Fill the substrate evenly and moisten it.
- Weigh a defined quantity of seed.
- Distribute the seeds as evenly as possible.
- Clearly label the tray with cultivar, batch and sowing date.
- Change only one important variable in the next cycle.
Controlling the germination phase
Keep radish seed evenly moist without leaving it continuously in free-standing water. A clean lid or second tray can help distribute moisture and pressure more uniformly during early germination, but the crop must still be inspected daily.
Remove the cover once the seedlings lift the stand and develop uniformly. Keeping them in darkness too long promotes pale, unstable and excessively elongated plants. The correct timing depends on cultivar, temperature, seed quality and growing method.
Light and crop development
After germination, radish microgreens need uniform light. Insufficient light often produces long, weak and pale plants. Excessive intensity, high heat load or too little distance from the lamp can instead cause leaf stress and uneven growth.
A reproducible day–night cycle and consistent distance between lights and plants are more important than blanket maximum values. Tray positions can be rotated regularly if measured lighting within the rack is uneven.
Watering and air movement
The root environment should remain moist but not saturated. Once established, careful bottom watering can keep leaf surfaces drier. Surplus water must not remain permanently in the bottom tray.
Gentle air movement helps remove moisture. Strong direct airflow is unsuitable because it can dry edges faster and cause uneven development. Condensation and persistently wet leaves are warning signs that require investigation.
Choosing harvest time by development stage
Calendar days provide guidance only. Crop height, leaf development, colour, stability and plant health are decisive. In a controlled hydroponic study of the “Rambo” radish cultivar at 25°C with a 16:8-hour light–dark cycle, day ten produced a favourable balance between yield and subsequent storage quality. At that point, about 75% of plants showed their first true leaf.
This study result cannot be transferred unchanged to every cultivar and installation. Temperature, light, sowing density, water supply and genotype alter development time. Harvesting by a documented developmental characteristic rather than solely by a fixed calendar day is therefore more useful in practice.
Harvesting cleanly
- Harvest only healthy, dry stands.
- Use clean, sharp tools that can be disinfected.
- Cut above the substrate.
- Do not introduce substrate or root material into the harvested crop.
- Use harvested produce promptly or cool it under controlled conditions.
Hygiene and food safety
Microgreens are often eaten raw. Clean procedures are therefore part of cultivation, not an optional measure added later. Clean trays, work surfaces, tools and hands before contact with seed or harvested produce. Pets, soil from houseplants, splashing water and other potential contamination sources do not belong in the production area.
Penn State Extension notes that water used for soaking, rinsing, irrigation and any post-harvest washing must be microbiologically suitable. Commercial production is subject to additional operational and legal requirements. The absence of visible mould alone does not demonstrate microbiological safety.
Distinguishing root hairs from problematic growth
Fine white root hairs can resemble uniform fuzz around the roots. Irregular growth on seed or substrate, unpleasant odours, discoloration, soft tissue or slimy areas instead indicate a problem. Do not eat a crop if its condition is uncertain.
Flavour and uses
Radish microgreens have a fresh, mustard-like to peppery pungency. They work well as an accent in salads, sandwiches, bowls, soups and vegetable dishes. They quickly lose texture on very hot food, so are generally added shortly before serving.
Intensity varies with cultivar and growing conditions. For recurring dishes, it is therefore useful to document pungency, texture, colour and harvest age through sensory assessment.
Common problems
Uneven germination
Possible causes include low germination capacity, uneven seed distribution, dry zones, fluctuating temperatures or inconsistent contact with the substrate.
Long, unstable stems
Common causes are insufficient light, excessive distance from the lamp, covering for too long or an overcrowded stand.
Wet, poorly aerated areas
Check the irrigation volume, drainage, sowing density, air movement and temperature differences. Affected or questionable crops must not be “rescued” merely by increasing ventilation and then eaten.
Uneven colour
Colour differences may be cultivar-related, but can also result from differences in light, tray position or crop density. Repeatable conditions help identify the cause.
A documented starter trial
- Select a clearly identified radish cultivar and seed batch.
- Test germination with a counted seed sample.
- Record tray area, substrate quantity and seed weight.
- Check moisture daily during germination.
- Record the start and duration of lighting.
- Photograph the harvest date and developmental stage.
- Record fresh weight, flavour, stability and losses.
- Change only one main variable in the next cycle.
This approach turns a fast beginner crop into a robust comparison process. Sowing density or production area should be increased substantially only after several cycles work reproducibly under similar conditions.